Teams can connect users, devices, and entire networks to Cloudflare One through several flexible on-ramps. Those on-ramps include traditional connectivity options like GRE or IPsec tunnels, our Cloudflare Tunnel technology, and our Cloudflare One device agent.
Each of these on-ramps send nearly all traffic to Cloudflare’s network where we can filter security threats with products like our Secure Web Gateway and Data Loss Prevention service. In other cases, the destination is an internal resource deployed in Cloudflare’s Zero Trust private network.
However, sometimes users want traffic to stay local. If a user is sitting within a few meters of their printer, they might prefer to connect through their local network instead of adding a hop through Cloudflare. They could configure Cloudflare to always ignore traffic bound for the printer, keeping it local, but when they leave the office they still need to use Cloudflare’s network to reach that printer remotely.
Solving this use case and others like it previously required manual changes from an administrator every time a user moved. An administrator would need to tell Cloudflare’s agent to include traffic sometimes and, in other situations, ignore it. This does not scale.
Starting today, any team using Cloudflare One has the flexibility to decide what traffic is sent to Cloudflare and what traffic stays local depending on the network of the user. End users do not need to change any settings when they enter or exit a managed network. Cloudflare One’s device agent will automatically detect and make the change for them.
Not everyone needs the same controls
Not every user in your enterprise needs the same network configuration. Sometimes you need to make exceptions for teams, certain members of staff, or speciality hardware/software based on business needs. Those exceptions can become a manual mess when you compound how locations and networks might also require different settings.
We’ve heard several examples from customers who run into that type of headache. Each case below describes a common theme: rigid network configuration breaks when it means real world usage.
In some cases, a user will work physically close to a server or another device that their device needs to reach. We talk to customers in manufacturing or lab environments who prefer to send all Internet-bound traffic to Cloudflare but want to continue to operate a private network inside their facility.
Today’s announcement allows teams to adapt to this type of model. When users operate inside the physical location in the trusted network, they can connect directly. When they leave, they can use Cloudflare’s network to reach back into the trusted network after they meet the conditions of the Zero Trust rules configured by an administrator.
In other situations, customers are in the process of phasing out legacy appliances in favor of Cloudflare One. However, the migration to a Zero Trust model sometimes needs to be stepwise and deliberate. In these cases, customers maintain some existing on-premise infrastructure while they deploy Cloudflare’s SASE solution.
As part of this release, teams can configure Cloudflare’s device agent to detect that a user sits inside a known location where those appliances still operate. The agent will automatically stop directing traffic to Cloudflare and instead send it to your existing appliances while you deprecate them over time.
Configuration Profiles and Managed Networks
Today’s release introduces the ability to create a profile, a defined set of configuration options. You can create rules that decide when and where profiles apply, changing settings without manual intervention.
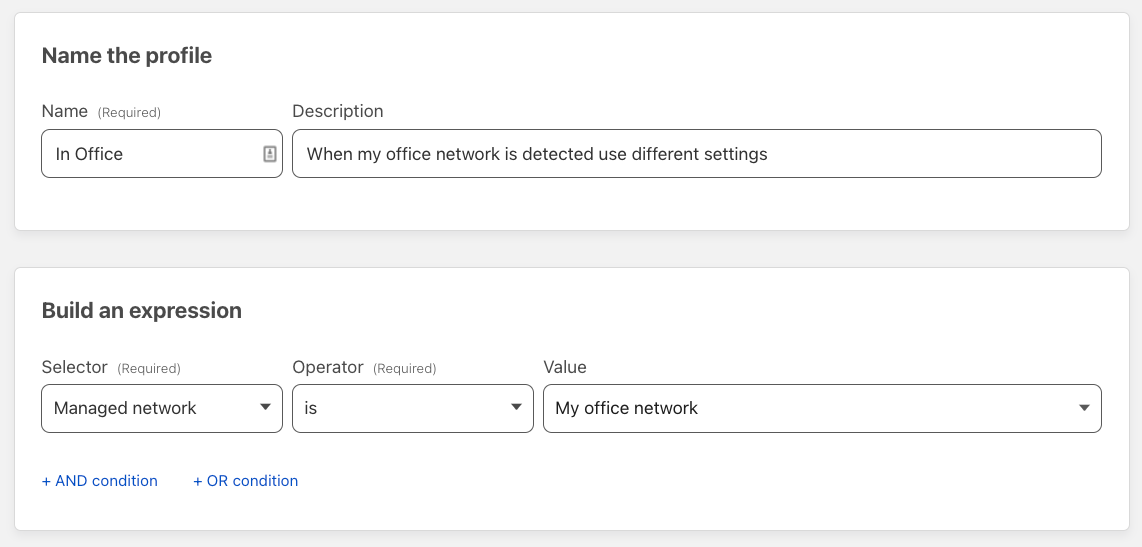
For our network-aware work, administrators can define a profile that decides what traffic is sent to Cloudflare and what stays local. Next, that profile can apply when users are in specific networks and not when they are in other locations.
Beyond network detection, profiles can apply based on user group membership. Not every user in your workforce needs the same on-ramp configuration. Some developers might need certain traffic excluded due to local development work. As part of this launch, you can configure profiles to apply based on who the user is in addition to where the user sits.
Defining a secure way to detect a network you manage
Cloudflare needs to be able to decide what network a device is using in a way that can’t easily be spoofed by someone looking to skirt policy. To solve that challenge, today’s release introduces the ability to define a known TLS endpoint which Cloudflare’s agent can reach. In just a few minutes, an administrator can create a certificate-validated check to indicate a device is operating within a managed network.
First, an administrator can create a TLS certificate that Cloudflare will use and match based on the SHA-256 hash of the certificate. You can leverage existing infrastructure or create a new TLS endpoint via the following example:
1. Create a local certificate you can use
openssl req -x509 -newkey rsa:4096 -sha256 -days 3650 -nodes -keyout example.key -out example.pem -subj "/CN=example.com" -addext "subjectAltName=DNS:example.com"
2. Extract the sha256 thumbprint of that certificate
openssl x509 -noout -fingerprint -sha256 -inform pem -in example.pem | tr -d :
Which will output something like this:
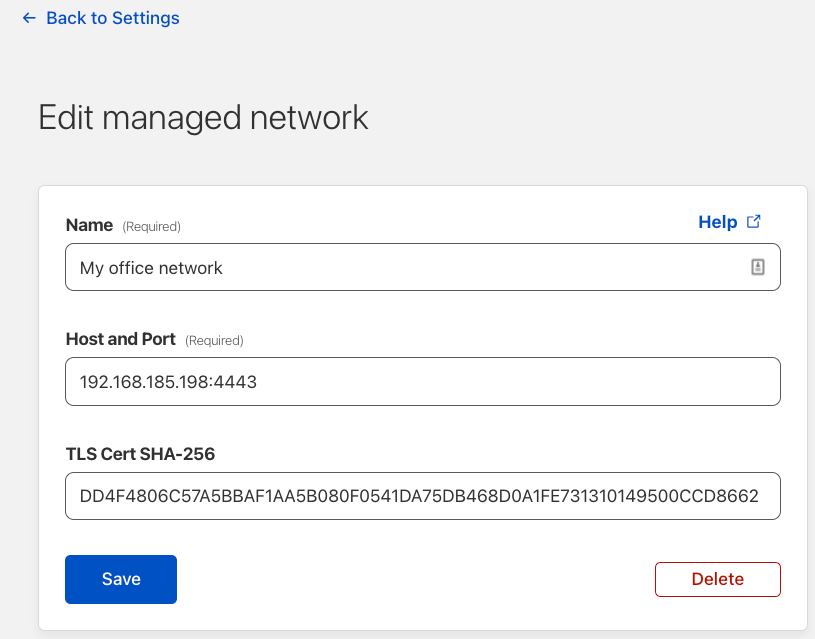
SHA256 Fingerprint=DD4F4806C57A5BBAF1AA5B080F0541DA75DB468D0A1FE731310149500CCD8662
Next, the Cloudflare agent running on the device needs to be able to reach that certificate to validate that it is connected to a network you manage. We recommend running a simple HTTP server inside your network which the device can reach to validate the certificate.
3. Create a python3 script and save as myserver.py as part of setting up a simple HTTP server.
import ssl, http.server

class BasicHandler(http.server.BaseHTTPRequestHandler):
    def do_GET(self):
        self.send_response(200)
        self.send_header('Content-type', 'text/html')
        self.end_headers()
        self.wfile.write(b'OK')
        return

server = http.server.HTTPServer(('0.0.0.0', 4443), BasicHandler)
sslcontext = ssl.create_default_context(ssl.Purpose.CLIENT_AUTH)
sslcontext.load_cert_chain(certfile='./example.pem', keyfile='./example.key')
server.socket = sslcontext.wrap_socket(server.socket, server_side=True)
server.serve_forever()
Run the server
python3 myserver.py
Configure the network location in Zero Trust dashboard
Once you’ve created the example TLS endpoint above, provide the fingerprint to Cloudflare to define a managed network.
- Login to your Zero Trust Dashboard and navigate to Settings → WARP Client
- Scroll down to Network Locations and click
Add newand complete the form. Use the Fingerprint generated in the previous step as the TLS Cert SHA-256 and the IP address of the device running the python script

Configure a Device Profile
Once the network is defined, you can create profiles that apply based on whether the agent is operating in this network. To do so, follow the steps below.
- Login to your Zero Trust Dashboard and navigate to Settings → WARP Client
- Scroll down to
Device Settingsand create a new profile that includes Your newly created managed network as a location

Reconnect your Agent
Each time the device agent detects a network change event from the operating systems (ex. waking up the device, changing Wi-Fi networks, etc.) the agent will also attempt to reach that endpoint inside your network to prove that it is operating within a network you manage.
If an endpoint that matches the SHA-256 fingerprint you’ve defined is detected, the device will get the settings profile as configured above. You can quickly validate that the device agent received the required settings by using warp-cli settings or warp-cli get-alternate-network from your command line / terminal.
What’s next?
Managed network detection and settings profiles are both new and available for you to use today. While settings profiles will work with any modern version of the agent from this last year, network detection requires at least version 2022.12.
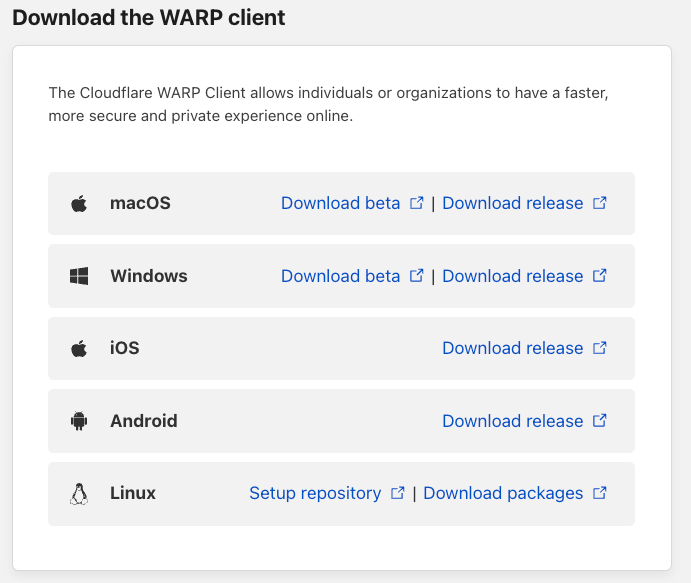
The WARP device client currently runs on all major operating systems and is easy to deploy with the device management tools your organization already uses. You can find the download links to all versions of our agent by visiting Settings →Downloads

Starting a Zero Trust journey can be daunting. We’re spending this week, CIO Week, to share features like this to make it less of a hassle to begin. If you want to talk to us to learn more about how to take that first step, please reach out.

