
This post is also available in 简体中文, 繁體中文, 日本語 and 한국어.

Everyone is chasing the highest cache ratio possible. Serving more content from Cloudflare’s cache means it loads faster for visitors, saves website operators money on egress fees from origins, and provides multiple layers of resiliency and protection to make sure that content is available to be served and websites scale effortlessly. A year ago we introduced Cache Reserve to help customer’s serve as much content as possible from Cloudflare’s cache.
Today, we are thrilled to announce the graduation of Cache Reserve from beta to General Availability (GA), accompanied by the introduction of several exciting new features. These new features include adding Cache Reserve into the analytics shown on the Cache overview section of the Cloudflare dashboard, giving customers the ability to see how they are using Cache Reserve over time. We have also added the ability for customers to delete all data in Cache Reserve without losing content in the edge cache. This is useful for customers who are no longer using Cache Reserve storage.
We’re also introducing new tools that give organizations more granular control over which files are saved to Cache Reserve, based on valuable feedback we received during the beta. The default configuration of Cache Reserve is to cache all available cacheable files, but some beta customers reported that they didn’t want certain rapidly-changing files cached. Based on their feedback, we’ve added the ability to define Cache Reserve eligibility within Cache Rules. This new rule lets users be very specific about which traffic is admitted to Cache Reserve.
To experience Cache Reserve firsthand visit the Cache Reserve section on the Cloudflare dashboard, press a single button to enable Cache Reserve, and experience cost-efficient, high-performance content delivery.
Caching background
Content delivery begins when a client or browser makes a request, be it for a webpage, video, application, or even a cat picture. This request travels to an origin server, aka the host of the requested content. The origin assembles the necessary data, packages it, and dispatches it back to the client. It's at this moment that website operators often incur a fee for transferring the content from their host to the requesting visitor. This per-GB of data “transferred” is a frequent line item on monthly hosting bills for website operators; we refer to them as egress fees or an “egress tax,” and have blogged previously on why we think it is bad practice.
During its return voyage to the client, Cloudflare has the ability to cache the origin’s response. Caching enables subsequent visitors, who are requesting the same content, to receive it from one of our cache servers rather than the origin server. Since the file is now served from Cloudflare's servers it saves the website operator from egress fees. It also means better performance, due to Cloudflare’s cache servers typically being physically situated much closer to end users than the customer’s own origin servers.
Serving files from cache is a fundamental, and often essential strategy for delivering content over the Internet efficiently. We can evaluate the efficacy of a cache by looking at its “hit/miss” ratio: when website content is served from a cache server it’s known as a cache hit. But when content is not in cache, and we need to go back to the origin server to get a fresh copy of the content, we call it a cache miss.
Why cache misses happen
Sometimes eligible content may not be served from cache for a variety of reasons. One scenario occurs when Cloudflare must revalidate with the origin to see if a fresh copy is available. This situation arises when a customer has configured a resource’s time-to-live (TTL) to specify how long cached content should be served to visitors, and when to consider it outdated (stale). How long a user specifies something is safe to be served from cache is only a part of the story, though. Content delivery networks (CDNs) also need to consider how to best utilize storage for all of their customers and perform network optimizations to ensure the right assets are cached in the right locations.
CDNs must decide whether to evict content before their specified TTL to optimize storage for other assets when cache space nears full capacity. At Cloudflare, our eviction strategy prioritizes content based on its popularity, employing an algorithm known as "least recently used" or LRU. This means that even if the content’s TTL specifies that content should be cached for a long time, we may still need to evict it earlier if it's less frequently requested than other resources, to make room for more frequently accessed content.

This approach can sometimes perplex users who wonder why a cache miss occurs unexpectedly. Without eviction, we'd be forced to store content in data centers farther from the requesting visitors, hindering asset performance and introducing inefficiencies into Cloudflare's network operations.
Some customers, however, possess large content libraries that may not all be requested very frequently but which they’d still like to shield from being served by their origin. In a traditional caching setup, these assets might be evicted as they become less popular and, when requested again, fetched from the origin, resulting in egress fees. Cache Reserve is the solution for scenarios like this one, allowing customers to deliver assets from Cloudflare’s network, rather than their origin server — avoiding any associated egress tax, and providing better performance.
Cache Reserve basics
Cache Reserve combines several Cloudflare technologies, including tiered cache and R2 storage, to seamlessly provide organizations with a way to ensure their assets are never evicted from Cloudflare’s network, even if they are infrequently accessed by users. Once admitted to Cache Reserve, content can be stored for a much longer period of time — 30 days by default — without being subjected to LRU eviction. If another request for the content arrives during that period, it can be extended for another 30-day period (and so on) or until the TTL signifies that we should no longer serve that content from cache. Cache Reserve serves as a safety net to backstop all cacheable content, so customers can sleep well at night without having to worry about unwanted cache eviction and origin egress fees.
Configuration of Cache Reserve is simple and efficient, on average taking seconds to configure and start seeing hit ratios increase dramatically. By simply pressing a single button in the Cache Reserve section of Cloudflare’s dashboard, all eligible content will be written to Cache Reserve on a miss and retrieved before Cloudflare would otherwise ask the origin for the resource. For more information about what’s required to use Cache Reserve, please review the documentation.
Customers are also seeing significant savings when using Cache Reserve, often seeing it cost only a fraction of what they would otherwise pay for the egress from their hosting provider. As Docker put it,
“The 2% cache hit ratio improvement enabled by Cache Reserve has eliminated roughly two-thirds of our S3 egress. The reduction in egress charges is almost an order of magnitude larger than the price we paid for Cache Reserve.”
Brett Inman, Docker | Senior Manager of Engineering
What’s new with Cache Reserve?
Since we’ve last blogged about Cache Reserve we have made three important updates to the product that improve the quality of life for users.
New analytics
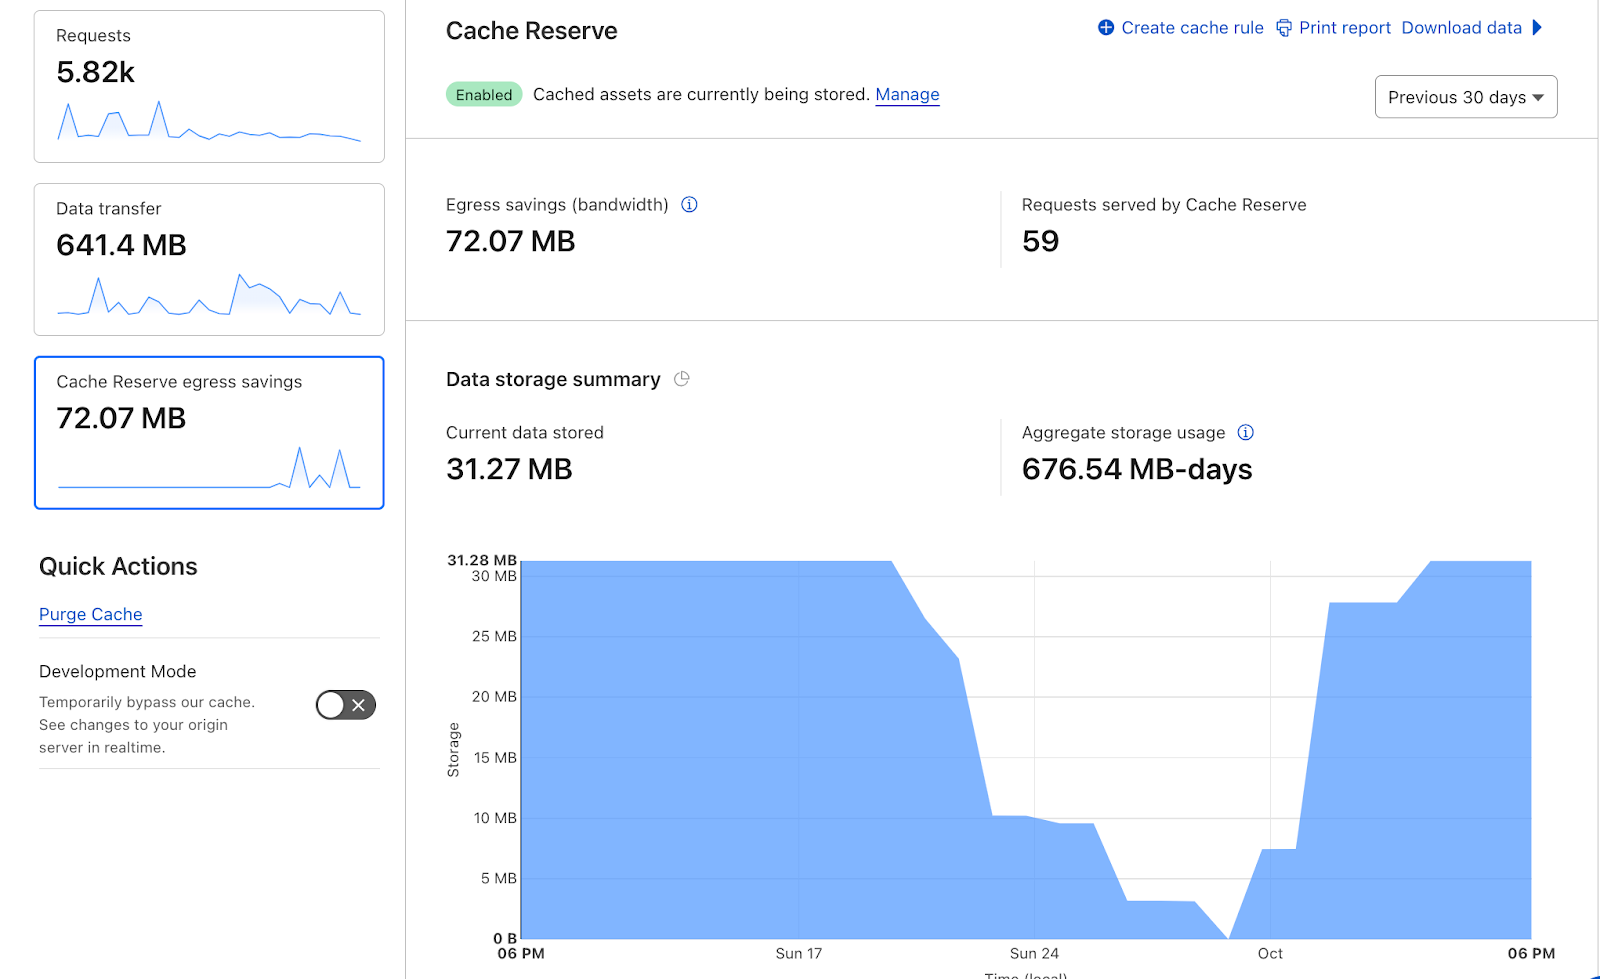
Previously, Cache Reserve analytics provided views of how much storage had been used by a particular website and estimates of the number of operations used in a particular time period. We’ve improved analytics to be more similar to traditional cache analytics, allowing customers to view storage and operations in a customized time series from the cache analytics dashboard.
Additionally, the updated Cache Reserve analytics will provide you an estimate of how much egress you’re saving by using the product.
In the coming months we will also provide greater visibility into the largest and most requested items being served from Cache Reserve.
Cache Reserve delete storage
Cache Reserve users who want to change, remove or stop using their Reserve altogether have asked for a simple way to wipe their storage without impacting their use of Cloudflare’s traditional edge cache. Previously clearing Cache Reserve would be achieved by purging content. This could be problematic because purging also wipes content cached in the traditional edge cache which could lead to additional origin fetches and egress fees.
We’ve built in a new way for customers to completely remove their Cache Reserve storage with the push of a button, which can be found in the Cache Reserve dashboard. When performing this action you will need to wait until Cache Reserve is cleared before re-enabling. This period can differ depending on how much is stored in your Cache Reserve, but in general can take around 24 hours.
The Cache Reserve delete button differs from purging. Purge will still allow for you to invalidate resources across all of Cloudflare’s Caches — including both Cache Reserve and the edge cache with a single request. The Cache Reserve delete button will actively remove the entire storage in the Reserve only. Currently, this action can be performed for the entire Cache Reserve storage associated with a zone.

Integration into Cache Rules
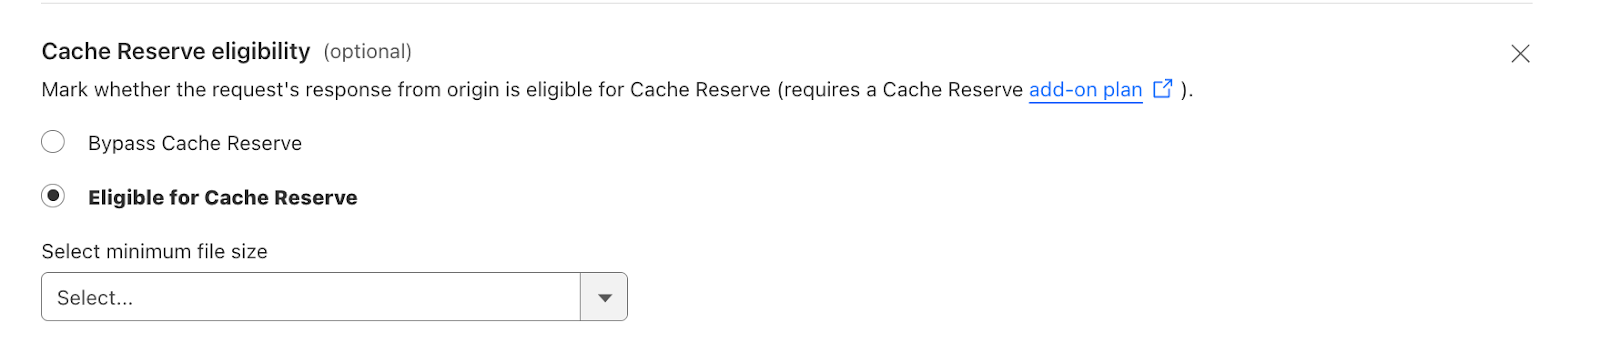
One of the most requested Cache Reserve features we heard from early adopters is the ability to specify what parts of their website should be eligible for storage in Cache Reserve. Previously, when a user enabled Cache Reserve, all of a website’s assets that were eligible for Cache Reserve could be stored in the Reserve. For egress sensitive customers, this is the path we still recommend. However, for customers that really want to customize what is eligible for Cache Reserve, you can now use Cache Rules to specify assets that should be stored in Cache Reserve based on the usual Cache Rules fields (hostnames, paths, URLs, etc.) and also by using specific new rules configurations like the minimum size of a resource. For example, you can specify that all assets that should be written to Cache Reserve have a minimum size of 100kb. By using the new rules functionality, Cache Reserve customers can customize how their Reserve is built while still maintaining utilization of the edge cache, and saving even more money.
Try out Cache Reserve today!
You can easily sign up for Cache Reserve in the Cloudflare Dashboard by navigating to the Cache section, clicking on Cache Reserve, and pushing enable storage sync. Try it out and let us know what you think!